- 1. Getting Started
-
2.
First Semester Topics
-
General Chemistry Review
- Introduction
- Electron Configurations of Atoms
- QM Description of Orbitals
- Practice Time - Electron Configurations
- Hybridization
- Closer Look at Hybridization
- Strategy to Determine Hybridization
- Practice Time! - Hybridization
- Formal Charge
- Practice Time - Formal Charge
- Acids-bases
- Practice Time - Acids and Bases
- Hydrogen Bonding is a Verb!
- Progress Pulse
-
Structure and Bonding
- Chemical Intuition
- From Quantum Mechanics to the Blackboard: The Power of Approximations
- Atomic Orbitals
- Electron Configurations of Atoms
- Electron Configurations Tutorial
- Practice Time - Structure and Bonding 1
- Lewis Structures
- Drawing Lewis Structures
- Valence Bond Theory
- Valence Bond Theory Tutorial
- Hybridization
- Polar Covalent Bonds
- Formal Charge
- Practice Time - Structure and Bonding 2
- Curved Arrow Notation
- Resonance
- Electrons behave like waves
- MO Theory Intro
- Structural Representations
- Progress Pulse
-
Acids/Base and Reactions
- Reactions
- Reaction Arrows: What do they mean?
- Thermodynamics of Reactions
- Acids Intro
- Practice Time! Generating a conjugate base.
- Lewis Acids and Bases
- pKa Scale
- Practice Time! pKa's
- Predicting Acid-Base Reactions from pKa
- Structure and Acidity
- Structure and Acidity II
- Practice Time! Structure and Acidity
- Curved Arrows and Reactions
- Nucleophiles
- Electrophiles
- Practice Time! Identifying Nucleophiles and Electrophiles
- Mechanisms and Arrow Pushing
- Practice Time! Mechanisms and Reactions
- Energy Diagrams and Reactions
- Practice Time! - Energy Diagrams
- Progress Pulse
- Introduction to Retrosynthesis
-
Alkanes and Cycloalkanes
- Introduction to Hydrocarbons and Alkanes
- Occurrence
- Functional Groups
- Practice Time! Functional Groups.
- Structure of Alkanes - Structure of Methane
- Structure of Alkanes - Structure of Ethane
- Naming Alkanes
- Practice Time! Naming Alkanes
- Alkane Isomers
- Relative Stability of Acyclic Alkanes
- Physical Properties of Alkanes
- Ranking Boiling Point and Solubility of Compounds
- Conformations of Acyclic Alkanes
- Practice Time! Conformations of acyclic alkanes.
- Conformations of Cyclic Alkanes
- Naming Bicyclic Compounds
- Stability of Cycloalkane (Combustion Analysis)
- Degree of Unsaturation
-
Stereochemistry
- Enalapril in ACE
- Constitutional and Stereoisomers
- Chirality or Handedness
- Drawing a Molecules Mirror Image
- Exploring Mirror Image Structures
- Enantiomers
- Drawing Enantiomers
- Practice Time! Drawing Enantiomers
- Identifying Chiral Centers
- Practice Time! Identifying Chiral Molecules
- CIP (Cahn-Ingold-Prelog) Priorities
- Determining R/S Configuration
- Diastereomers
- Meso Compounds
- Fischer Projections
- Fischer Projections: Carbohydrates
- Measuring Chiral Purity
- Practice Time! - Determining Chiral Purity and ee
- Chirality and Drugs
- Chiral Synthesis
- Prochirality
- Converting Fischer Projections to Zig-zag Structures
- Practice Time! - Assigning R/S Configurations
-
Alkenes and Addition Reactions
- The Structure of Alkenes
- Alkene Structure - Ethene
- Physical Properties of Alkenes
- Naming Alkenes
- Health Insight - BVO (Brominated Vegetable Oil)
- E/Z and CIP
- Stability of Alkenes
- H-X Addition to Alkenes: Hydrohalogenation
- Practice Time - Hydrohalogenation
- X2 Addition to Alkenes: Halogenation
- HOX addition: Halohydrins
- Practice Time - Halogenation
- Hydroboration/Oxidation of Alkenes: Hydration
- Practice Time - Hydroboration-Oxidation
- Oxymercuration-Reduction: Hydration
- Practice Time - Oxymercuration/Reduction
- Oxidation and Reduction in Organic Chemistry
- Calculating Oxidation States of Carbon
- Identifying oxidation and reduction reactions
- Practice Time - Oxidation and Reduction in Organic
- Oxidation
- Reduction
- Capsaicin
-
Alkynes
- Structure of Ethyne (Acetylene)
- Naming Alkynes
- Practice Time! - Naming Alkynes
- Physical Properties of Alkynes
- Preparation of Alkynes
- Practice Time! - Preparation of Alkynes
- H-X Addition to Alkynes
- X2 Addition
- Hydration
- Reduction of Alkynes
- Practice Time! - Addition Reactions of Alkynes
- Oxidative Cleavage of Alkynes
- Alkyne Acidity and Acetylide Anions
- Reactions of Acetylide Anions
- Retrosynthesis Revisted
- Practice Time! - Multistep Synthesis Using Acetylides
-
Alkyl Halides and Alcohol
- Naming Alkyl Halides
- Naming Alcohols
- Classes of Alcohols and Alkyl Halides
- Practice Time! - Naming Alkyl Halides
- Practice Time! - Naming Alcohols
- Physical Properties of Alcohols and Alkyl Halides
- Structure and Reactivity of Alcohols
- Structure and Reactivity of Alkyl Halides
- Preparation of Alkyl Halides and Tosylates from Alcohols
- Practice Time! - Alcohols to Alkyl Halides
- Preparation of Alkyl Halides from Alkenes; Allylic Bromination
- Strategy for Predicting Products of Allylic Brominations
- Practice Time! - Allylic Bromination
-
Substitutions (SN1/SN2) and Eliminations (E1/E2)
- Introduction
- Solvents
- SN1 Reaction: The Carbocation Pathway
- SN2 Reactions: The Concerted Backside Attack
- SN1 vs. SN2: Choosing the Right Path
- Application: Cardura (Doxazosin)
- E1 Reactions: Elimination via Carbocations
- E2 Reactions: The Concerted Elimination
- E1cB: The Conjugate Base Elimination Pathway
- Substitution versus Elimination
- Dienes, Allylic and Benzylic systems
-
General Chemistry Review
-
3.
Second Semester Topics
- Arenes and Aromaticity
-
Reactions of Arenes
- Electrophilic Aromatic Substitution
- EAS-Halogenation
- EAS-Nitration
- Practice Time - Synthesis of Aniline
- EAS-Alkylation
- Practice Time - Friedel Crafts Alkylation
- EAS-Acylation
- Practice Time - Synthesis of Alkyl Arenes
- EAS-Sulfonation
- Practice Time - EAS
- Donation and Withdrawal of Electrons
- Regiochemistry in EAS
- Practice Time - Directing Group Effects
- Synthesizing Disubstituted Benzenes: Effects of Substituents on Rate and Orientation
- Steric Considerations
- Strategies for Synthesizing Disubstituted Benzenes
- NAS - Addition/Elimination
- NAS - Elimination/Addition - Benzyne
- Alcohols and Phenols
-
Ethers and Epoxides
- Intro and Occurrence
- Crown Ethers and Cryptands
- Preparation of Ethers
- Reactions of Ethers
- Practice Time - Ethers
- Preparation of Epoxides
- Reactions of Epoxides - Acidic Ring Opening
- Practice Time - Acidic Ring Opening
- Reactions of Epoxides - Nucleophilic Ring Opening
- Practice Time - Nucleophilic Ring opening
- Application - Epoxidation in Reboxetine Synthesis
- Application - Nucleophilic Epoxide Ring Opening in Crixivan Synthesis
- Physical Properties of Ethers and Epoxides
- Naming Ethers and Epoxides
-
Aldehydes and Ketones
- Naming Aldehydes and Ketones
- Physical Properties of Ketones and Aldehydes
- Practice Time - Naming Aldehydes/Ketones
- Nucleophilic addition
- Addition of Water - Gem Diols
- Practice Time - Hydration of Ketones and Aldehydes
- Addition of Alcohols - Hemiacetals and Acetals
- Acetal Protecting Groups
- Hemiacetals in Carbohydrates
- Practice Time - Hemiacetals and Acetals
- Addition of Amines - Imines
- Addition of Amines - Enamines
- Practice Time - Imines and Enamines
- Application - Imatinab Enamine Synthesis
- Addition of CN - Cyanohydrins
- Practice Time - Cyanohydrins
- Application - Isentress Synthesis
- Addition of Ylides - Wittig Reaction
- Practice Time - Wittig Olefination
- Structure of Ketones and Aldehydes
- Carboxylic Acids and Derivatives
- Enols and Enolates
- Condensation Reactions
-
4.
NMR, IR, UV and MS
- Spectroscopy
-
HNMR
- Nuclear Spin
- Interpreting
- Chemical Shift
- Practice Time! - Chemical Shift
- Equivalency
- Indentifying Homotopic, Enantiotopic and Diastereotopic Protons
- Practice Time! - Equivalency
- Intensity of Signals
- Spin Spin Splitting
- Practice Time! - Spin-Spin Splitting
- Primer on ¹³C NMR Spectroscopy
- Alkanes
- Alkynes
- Alcohols
- Alkenes
- Coupling in Cis/Trans Alkenes
- Ketones
- HNMR Practice 1
- HNMR Practice 2
- HNMR Practice 3
- HNMR Practice 4
- Exchangeable Protons and Deuterium Exchange
- IR - Infrared Spectroscopy
- UV - Ultraviolet Spectroscopy
- Mass Spectrometry
-
5.
General Chemistry
- General Chemistry Lab
- Strategy for Balancing Chemical Reactions
- Calculator Tips for Chemistry
- Significant Figures
- Practice Time! Significant Figures
- Spreadsheets - Getting Started
- Spreadsheets - Charts and Trend lines
- Standard Deviation
- Standard Deviation Calculations
- Factor Labels
- Practice Time! - Factor Labels
- Limiting Reagent Problem
- Percent Composition
- Molar Mass Calculation
- Average Atomic Mass
- Empirical Formula
- Practice time! Empirical and Molecular Formulae
- Initial Rate Analysis
- Practice Time! Initial Rate Analysis
- Solving Equilibrium Problems with ICE
- Practice Time! Equilibrium ICE Tables
- Le Chatelier's
- Practice Time! Le Chatelier's Principle
- 6. Organic Chemistry Lab
- 7. Tools and Reference
-
8.
Tutorials
- Reaction Mechanisms (introduction)
- Factor Labels
- Acetylides and Synthesis
- Drawing Cyclohexane Chair Structures
- Drawing Lewis Structures
- Aromaticity Tutorial
- Common Named Aromatics (Crossword Puzzle)
- Functional Groups (Flashcards)
- Characteristic Reactions of Functional Groups
- Alkyl and Alkenyl Groups
- Valence Bond Theory
- Alkane Nomenclature
-
9.
The Alchemy of Drug Development
- Ivermectin: From Merck Innovation to Global Health Impact
- The Fen-Phen Fix: A Weight Loss Dream Turned Heartbreak
- The Asymmetry of Harm: Thalidomide and the Power of Molecular Shape
- Semaglutide (Ozempic): From Lizard Spit to a Once-Weekly Wonder
- From Cocaine to Novocain: The Development of Safer Local Anesthesia
- The Crixivan Saga: A Targeted Strike Against HIV
- The story of Merck’s COX-2 inhibitor, Vioxx (rofecoxib)
- The Accidental Aphrodisiac: The Story of Viagra
- THC: A Double-Edged Sword with Potential Neuroprotective Properties?
- Ritonavir Near Disaster and Polymorphism
- 10. Allied Health Chem
Clear History
Quick Menu
Lab Equipment Guide
Using a Pipet
Cleaning the Pipet
In order for the pipet to deliver the proper amount of solution, it must be properly cleaned.
1. Using the appropriate technique for filling the pipet, draw distilled water into the pipet until it almost reaches the bulb. Remove the bulb and allow the water to drain. If the water drains without leaving droplets on the inside of the pipet, repeat this rinse twice more and go on to step two. If droplets cling to the inside of the pipet, clean it with detergent solution or cleaning solution. Rinse many times with tap water, then repeat the distilled water rinses.
2. Draw a small amount of the solution you wish to pipet into the pipet. Tilt and roll the pipet so that the solution has contact with all the inside surfaces. Discard the solution from the rinses. Repeat this rinse at least once more.
3. When you are finished with the pipet in your experiment, rinse with distilled water.
Pipetting Instructions
1.Obtain the appropriate amount of the solution you wish to pipet in a small, clean, dry beaker. Never pipet directly out of the stock bottles of solution. This creates a contamination risk.
2.Insert the tip of the pipet into the beaker of solution so that it is about 1/4” from the bottom. Be sure not to press the tip against the bottom of the container.
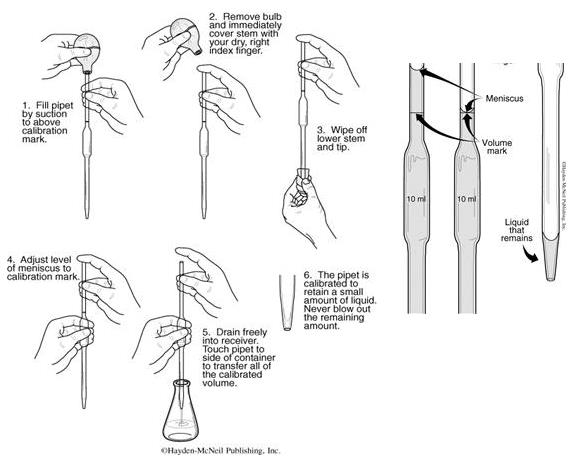
3.If you are right-handed, hold the pipet in your right hand, leaving your index finger free to place over the top of the pipet. Good technique requires you to cap the pipette with your finger NOT your thumb. Your index finger is more dexterous and will lead to more precise control. With your left hand, squeeze the pipet bulb. Press it firmly over the top of the pipet, but DO NOT INSERT THE PIPET INTO THE BULB!! Release the pressure on the bulb and allow the solution to flow into the pipet until it is above the volume mark. Do not allow the solution to reach the bulb.
4.Quickly remove the bulb and place your index finger firmly over the top of the pipet. Slowly roll you finger to one side and allow the liquid to drain until the bottom of the meniscus is aligned with the volume mark. With practice you will be able to lower the liquid very, very slowly [NOTE: Do not use your Thumb!!!].
5. When the bottom of the meniscus is even with the volume mark, press your index finger firmly on the top of the pipet so no liquid leaks out. Pull the pipet out of the solution and touch the tip once to the side of the container. Wipe the tip with to remove any hanging drops.
6.To transfer the solution, place the tip of the pipet against the wall of the receiving container at an angle of 10-20 degrees. Slowly allow the liquid to drain from the pipet. Keep the flow slow so that no droplets cling to the inside of the pipet. Touching the container wall draws out the liquid without leaving a drop hanging on the pipet.
7.When the solution stops flowing, touch the pipet once to the side of the receiving container to remove any hanging drops. DO NOT blow out the remaining solution. The pipet has been calibrated to deliver the appropriate amount of solution with some remaining in the tip.
Using a Buret
Cleaning the buret
The buret must be properly cleaned to deliver the proper amount of solution.
Using the appropriate technique for filling the buret, pour distilled water into the buret and allow the water to drain. If the water drains without leaving droplets on the inside, repeat this rinse twice more and go on to step two. If droplets cling to the inside, clean it with detergent solution or cleaning solution. Rinse many times with tap water, then repeat the distilled water rinses without droplets.
Add a small amount of solution you wish to use into the buret. Tilt and roll the buret so that the solution has contact with all the inside surfaces. Discard the solution from the rinses. Repeat this rinse at least once more.
When you are finished with the buret in your experiment, make sure to rinse it with distilled water.
Using the buret
1.Add solution to buret, make sure all bubbles that are trapped under the stopcock are removed. They can seriously impact the accuracy and precision of the measurements. These bubbles can usually be removed by opening the stopcock fully and letting drain for a few seconds. A tenacious bubble can be expelled by carefully giving the buret an abrupt shake while draining.
2.The amount of solution delivered from a buret is relative to the starting and ending values. This is why the reticule "appears" to be labeled backwards. To determine the amount delivered, subtract the starting volume form the ending volume. It is very important to read the meniscus reproducibly.
3.The markings on the buret are not negligible in comparison to distance markings! The thickness of a mark is roughly 0.02 ml. To use the buret accurately, you need to select on portion of the markings to be called 0 (top, center or bottom of marking). Read all markings accordingly. Where you decide to define the ‘0’ mark is irrelevant as long as you are consistent!
4. Near the end point of a titration, try to deliver less than one drop at a time. This can be done in two ways.
a)open stopcock slowly until one drop is hanging from the tip. Touch the tip to the wall of the receiving flask and tip the flask so the main body of the solution washes over the drop. Then swirl the flask.
b)Turn the stopcock quickly from a closed-open-closed position to expel a fraction of a drop.
Using a Volumentric Flask
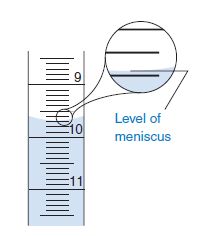
1.Usually calibrated for the meniscus to be on the center of the mark on the neck of the flask. The calibrations are usually conducted at 200 C.
2.Clean the volumetric flask by rinsing with distilled water. Make sure it drains cleanly (no drops are left behind).
3.Dissolve the desired mass of reagent in the flask by swirling with less than 2/3 final volume of liquid. This will allow the solution to be agitated and increase the speed of dissolution. If liquid is filled to mark before solid is dissolved, could take a very long time to get all solid in solution!
4.Once solid is dissolved add more liquid and swirl the solution again.
5.Adjust the final volume with as much well-mixed liquid in the flask as possible.
6.Add final drops of liquid with a transfer pipet (plastic dropper).
7.Finally, cap and invert the flask 20 times to ensure complete mixing.
Using a Microliter Syringe
1.Take up and discard several volumes of liquid to wash the glass walls and to remove air bubbles from the barrel.
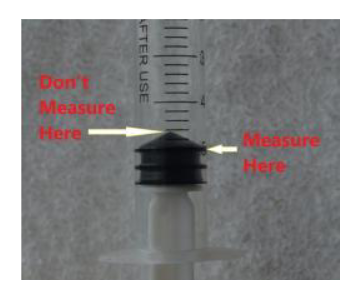
2.Draw liquid up past the volume to be dispensed and then slowly drain the syringe until the meniscus is at the proper volume. The syringe should be read from the first "plunger ring" NOT from the tip of the inner cone! Make sure you make precise measurements!!!
3.Empty the syringe while, keeping the needle in contact with the container wall. This will prevent a "hanging drop" from forming.
4.When finished, rinse the syringe with multiple washings of distilled water. The steel needle is easy to oxidize.
5.Never use a syringe to deliver strong acids. These chemicals will react with the steel needle introducing iron contamination to your solution.
Vacuum Filtration
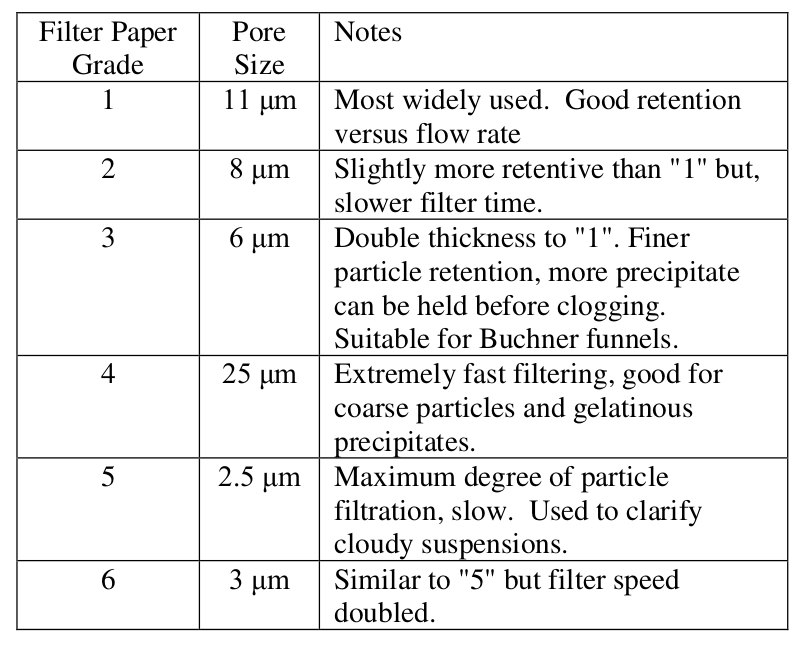
Add grade 3 filter paper to the Buchner funnel (grade 1 can be used), wet the filter paper with water to make sure it seats properly. There are many grades of filter paper are available. The one best suited to the experiment should be used. Look at the accompanying table for the benefits and penalties for the different filter grades. As can be seen, filter paper versus flow rate grade "3" is designed for Buchner.
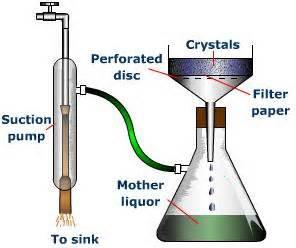
Connect the vacuum flask to the aspirator and turn on the water. Make sure the vacuum flask has a decent vacuum before proceeding. The vacuum is directly related to water pressure. As water pressure drops, the vacuum diminishes. Upon filtering, make sure the funnel rests on the lip of the flask and use a stirring rod to guide liquid into funnel. Use a jet of appropriate wash liquid to transfer all particles.
Using a UV/Vis Spectrometer
Visible spectroscopy involves passing a beam of light through a solution of interest. The solution is evaluated by measuring the absorption of the light beam by the solute molecules.
The Beer-Lambert law, or simply Beer's Law is the heart of spectroscopy as applied to analytical I chemistry. A is the absorbance (A unitless quantity). It is the logarithm of A = bc = − log the fraction of light that passes through the sample (I/Io) where Io is the I 0 intensity of the incident beam and I is the intensity of the beam after it has passed through the sample. Being that absorbance derived from a logarithm, it is usually reported as a unitless quantity.
If the absorbance A= ‘2’ then only 1 % (antilog of ‘-2’ is “0.01”) of the light beam is transmitted through the sample! Therefore, starting absorbances must be significantly less than ‘2’ or too much error will be in the measurements. A good starting point is usually considered around A = 1.5. At this abosbance, 31.6 % of the light is transmitted through the sample.
The Beer-Lambert law, or simply Beer's Law is the heart of spectroscopy as applied to analytical chemistry. Beer's Law relates the molar absorbtivity (ɛ), pathlength (b) and concentration (c) of the solution to absorbance. The molar absorbtivity is a characteristic of the substance that indicates how much light is absorbed by the compound at a particular wavelength. It possesses the units M-1cm-1. The pathlength (b) relates the distance light travels through the sample cell (in cm). The molar absorbtivity and pathlength are constant for each solution for and cuvette sample holder.
Therefore, Beer’s law states that the absorbance of a sample at a given wavelength is directly proportional to the concentration (c) of the solute in the sample. By measuring multiple samples at a constant wavelength, a calibration curve can be constructed. This calibration curve enables us to find the concentration of an unknown by comparing the unknown sample’s absorbance at the chosen wavelength to those of the samples of known concentration. The wavelength used for this comparison is the wavelength of the highest peak in the unknown sample. This wavelength is called the analytical wavelength. Remember, If you have an absorbance of 2, it indicated that only 1 % of the incident beam penetrates the sample. For good data, you should keep the absorbance below ~1.8 (15 % of incident beam transmitted).
